I love all patterns by Anna of Noodle Head and this one is free, a super little canvas pencil case tutorial which is a great scrap buster too
I love working with Cotton Canvas, it's such a versatile fabric and so strong, keep an eye out, I'll be getting it in the Bobbin Girl Shop soon
Friday, 31 March 2017
Free Canvas Pencil Case Tutorial
Wednesday, 15 March 2017
Wednesday, 8 March 2017
Bag Making For Beginners Part 1 - How to print off and put together a PDF Pattern
In part one of my Bag Makers for Beginners series, I would like to show you how to accurately print off and stick together a pdf pattern so that it is the correct size.
Getting your pattern the right size is essential, if you print it too small, your bag will be too small, print it to big, your pattern will be too big and the pattern pieces may not fit together as the designer intended
For the purpose of this tutorial I have chosen to use the Ethel Bag by Swoon Patterns, not only is it a free pattern, but it's also a great pattern for beginners, simple in construction, yet the finished result is a great looking bag
This is my Ethel
Step one
Once you have purchased your pattern and downloaded it, open it up (almost certainly using Adobe Reader).
Begin by printing the test square page. All pattern designers include a test square to ensure that you print the pattern to the correct size.
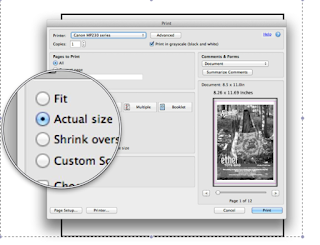
For Ethel, the test square is 3 inches. Find this page in the pattern and select Print and when the dialogue box comes up make sure you check the "Actual Size" option. I also check the "Print in Grayscale (Back and White) option too because it saves on ink and prints quicker

Once printed, check with a ruler that the box is indeed 3" x 3" in size. If yes, then you can carry on printing the remainder of your pattern.
Step 3
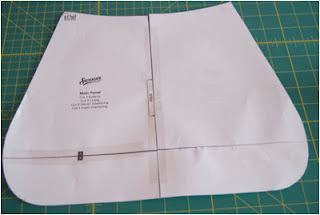
Join the pieces together with tape - again be really accurate, butt up each piece and match the letters or sometimes shapes
Once you've taped all your pattern pieces together, you'll be ready to cut out your fabric
Getting your pattern the right size is essential, if you print it too small, your bag will be too small, print it to big, your pattern will be too big and the pattern pieces may not fit together as the designer intended
For the purpose of this tutorial I have chosen to use the Ethel Bag by Swoon Patterns, not only is it a free pattern, but it's also a great pattern for beginners, simple in construction, yet the finished result is a great looking bag
This is my Ethel
Step one
Once you have purchased your pattern and downloaded it, open it up (almost certainly using Adobe Reader).
Begin by printing the test square page. All pattern designers include a test square to ensure that you print the pattern to the correct size.
For Ethel, the test square is 3 inches. Find this page in the pattern and select Print and when the dialogue box comes up make sure you check the "Actual Size" option. I also check the "Print in Grayscale (Back and White) option too because it saves on ink and prints quicker

Once printed, check with a ruler that the box is indeed 3" x 3" in size. If yes, then you can carry on printing the remainder of your pattern.
Step 2
Cut out your pattern pieces using the black line as a guide, make sure you are really accurate
Step 3
Join the pieces together with tape - again be really accurate, butt up each piece and match the letters or sometimes shapes
A lot of patterns including Ethel are designed so that you cut out your fabric on the fold
I prefer to print 2 sets of pattern pieces and tape them together so I have the whole pattern piece. I find this is more accurate when cutting out my fabric, and it's really useful when it comes to pattern matching your fabric


Once you've taped all your pattern pieces together, you'll be ready to cut out your fabric
Tuesday, 7 March 2017
A Boxy Pouch, a free pattern and tutorial
Boxy Pouch by Sotak Handmade
This would make an ideal pencil case, make up case or even a handy storage pouch for your sewing tools
Finished Size 7" wide x 2" tall x 3" deep
This would make an ideal pencil case, make up case or even a handy storage pouch for your sewing tools
Finished Size 7" wide x 2" tall x 3" deep
Ciara Clutch PDF Pattern - FREE
A free pattern from ithinksew.com, the Ciara Clutch
Thursday, 2 March 2017
How to make a handbag tassel
I am excited to announce that Bobbin Girl is now selling tassel caps so you can make fun tassels to match your handbags.
I made this one for my Selena Tote, it only takes a few minutes yet the affect is really satisfying
Tools you will need:
1 piece of faux leather or matching fabric for your bag (I used a piece 4.75" wide x 3" tall to fit the tassel cap snuggly when rolled up)
Metal tassel cap
An awl or some other sharp tool that will fit through the screw hole on the cap
Pen
Small Screw Driver
Pair of scissors
Wooden stick or something similar to ease the tassle roll into the cap
Glue - I like to use Fabri Tac

Step 1
Cut and measure your piece of faux leather or fabric 4.75" wide x 3" tall
Step 2
On the wrong side of your faux leather or fabric, draw a line 1/2" from the top edge
Step 3
Cut the fringe of your tassel, up to but not past the 1/2" line. My cuts are approximately 3/8" apart but you can cut them as thin or thick as you want (just remember, the thinner they are, the less strong they are)
Step 5
Unroll the tassel and add glue all the way across the top
TIP don't use too much glue otherwise it will seep out when you roll the tassel back up
Step 6
Put some glue (again not too much) into the tassel cap itself
Step 7
After adding the glue, roll your tassel back up, again as tightly as you can, insert it into the tassel cap - I used a little pointed wooden stick to ease it into the cap until I felt it was secure
Step 8
Use an awl or similar sharp, pointed tool and poke it through the small screw hole in the side of the cap - push it in as far as possible as this will help the screw go into your faux leather more easily
I got the screw started by hand before using a small screw driver to screw it in place. Your tassel is now complete, hang it from your bag with pride because you made it!!
I made this one for my Selena Tote, it only takes a few minutes yet the affect is really satisfying
Tools you will need:
1 piece of faux leather or matching fabric for your bag (I used a piece 4.75" wide x 3" tall to fit the tassel cap snuggly when rolled up)
Metal tassel cap
An awl or some other sharp tool that will fit through the screw hole on the cap
Pen
Small Screw Driver
Pair of scissors
Wooden stick or something similar to ease the tassle roll into the cap
Glue - I like to use Fabri Tac

Step 1
Cut and measure your piece of faux leather or fabric 4.75" wide x 3" tall
Step 2
On the wrong side of your faux leather or fabric, draw a line 1/2" from the top edge
Step 3
Cut the fringe of your tassel, up to but not past the 1/2" line. My cuts are approximately 3/8" apart but you can cut them as thin or thick as you want (just remember, the thinner they are, the less strong they are)
Step 4
To test that your tassel will fit into the tassel cap, roll it up tightly along the top and insert it into the tassel cap. If you have trouble getting into the cap, unroll the tassel and trim the width a little bit
Unroll the tassel and add glue all the way across the top
TIP don't use too much glue otherwise it will seep out when you roll the tassel back up
Step 6
Put some glue (again not too much) into the tassel cap itself
Step 7
After adding the glue, roll your tassel back up, again as tightly as you can, insert it into the tassel cap - I used a little pointed wooden stick to ease it into the cap until I felt it was secure
Step 8
Use an awl or similar sharp, pointed tool and poke it through the small screw hole in the side of the cap - push it in as far as possible as this will help the screw go into your faux leather more easily
I got the screw started by hand before using a small screw driver to screw it in place. Your tassel is now complete, hang it from your bag with pride because you made it!!
Labels:
Bobbin Girl Bag Making Supplies,
Faux Leather,
hand bag tassels,
tassel,
tassel caps,
tutorials
Subscribe to:
Comments (Atom)


